Creative Editing Techniques to Remove Objects with Photoshop
“Learn the rules like a pro, so you can break them like an artist.” – Pablo Picasso
Every photographer has their preferred method, or flow, in the editing process. Mostly, there is no right or wrong way to do a given task. However, there might be a variety of methods that saves time.
I gravitate towards Lightroom and Photoshop for editing, which are part of the Adobe Creative Cloud family. Lightroom has become a convenient image preview tool for culling, using it as a RAW editor, and organizing photos. While other editing and viewing programs are available, such as Adobe Bridge, these are the ones that have worked well for me.
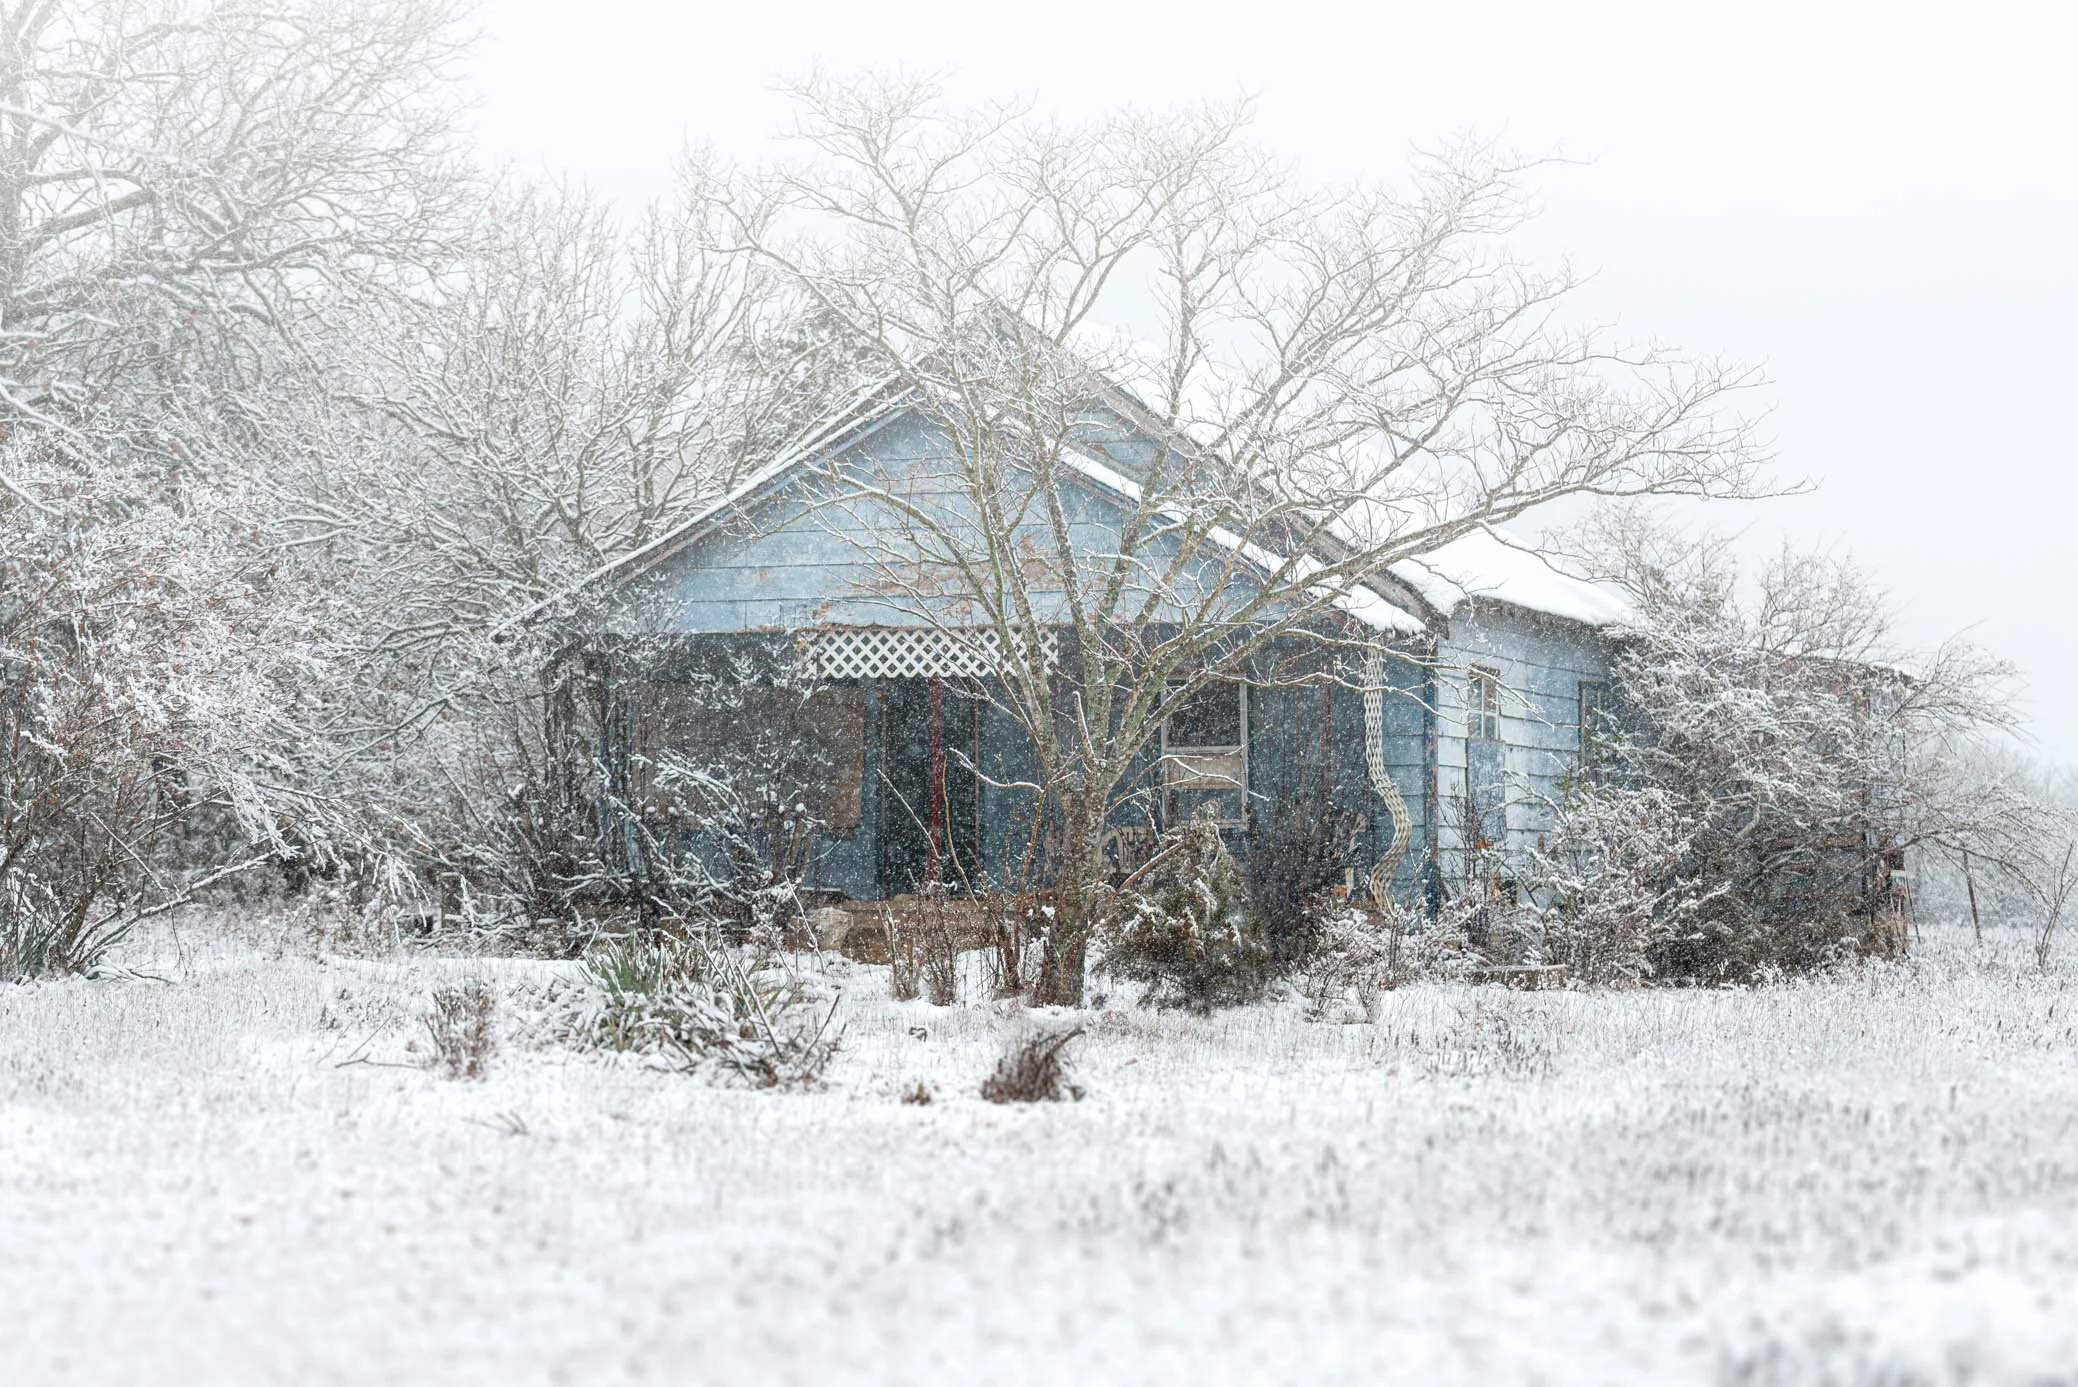
For this tutorial, I have selected an image of a snowy abandoned home and imported it into Lightroom to make a few quick RAW image adjustments. These include:
White balance;
Exposure;
Contrast;
Highlights;
Shadows;
Whites;
Blacks;
Sharpness; and
Lens Correction.
While artificial intelligence, or AI, such as Adobe Firefly and generative fill, can make light of many scenarios, basic editing techniques often yield the best and most realistic results. AI is becoming a powerful tool in photo editing, but it is essential to understand that it is not always the best technique.
Anything I intend to adjust before exporting the final product, including cropping, is performed last.
Once the photo is adjusted, it is ready to be imported into Photoshop. Depending on your system, the method to achieve this can be different. For example, right-clicking the image on a PC will generate a dialog box. From there, I can select the option to edit in Photoshop – Right Click > Edit In > Edit in Photoshop.
Once the image loads in Photoshop, I unlock the layer by clicking the padlock icon to the right of the background image layer. This renames it Layer 0.
The first adjustment I wanted to make was to remove the fence. Artifact removal can be challenging depending on the complexity of the object and its surroundings. In this case, the fence is made up of smaller wires and piping of various sizes, shapes, and angles.
Several methods can be used to remove artifacts. You will need to experiment with one or more removal tools for a given project, as one may not yield the desired results in all situations. The two methods that worked best for this project were the Clone Stamp Tool and the Spot Healing Brush.
The clone stamp works better when replacing an object and rebuilding complex backgrounds. On the other hand, the healing brush quickly removes small items and often does an excellent job of matching surroundings. In this case, the clone stamp tool is better suited for removing the pipe and large objects, while the healing brush works well on the wire portions of the fence.
There are several methods to tackle the process of replacing the fence. However, I use a technique of separating a few adjustments on individual layers. This way, I can easily see a smaller number of the changes I made rather than making all the adjustments on one layer, such as Layer 0. This also prevents the need to delete your progress and start over if you make a mistake.
First, I created a new blank layer. When using the clone stamp, ensure the sample option is set to “current and below.” For the healing brush, place a checkmark next to sample each layer. Choosing a small section, I use a combination of both tools to replace portions of the fence. In this first example, only the healing brush was necessary to replace the wire.
I created another new blank layer to work on a new section of the fence. This time, I eliminated some of the remaining wire with the healing brush and used the clone stamp to work on a section of fence pipe. When selecting items to clone, it is advisable to choose an area close to the subject you are replacing to help maintain consistency and realism. This might mean you only sample a small area and make minor adjustments before re-sampling another area vs. attempting to clone stamp an entire area at once. Sampling smaller areas is a more time-consuming process, and depending on the complexity of the object, this can take several attempts or several minutes.
I create a new blank layer each time I remove small sections of the fence. The amount of removal is based on personal preference. Layers can then be independently turned off to view changes associated with a given layer. This also makes it easier to come back and make changes later if needed.
In this instance, some parts of the scene is affected after clone stamping due to a lack of information in the surrounding areas. This resulted in blurred edges or repeated patterns. These areas are easily fixed with the clone stamp or healing brush and a little time and patience.
Create each new layer by using the new layer icon, the appropriate shortcut, or copying the previous layer. When creating a copy of the layer, however, you are copying the changes from the layer below in addition to adding new modifications. This makes it a little harder to identify what changes have been made. For example, Layer 1, copies 1 and 2, include all prior and new adjustments. However, each new blank layer excludes any previously made adjustments. Choose the method you are most comfortable with, but the latter is the best option.
There is no limit to the number of layers you can create. In this case, there are a total of eleven. To keep things clean, I group the layers into one folder. You can label each layer, but I prefer to label the group.
After all of the artifacts have been removed, I spend time looking over the foreground to ensure that the edges around objects appear natural. In addition, clone stamping large areas creates some inconsistencies. In this instance, parts of the foreground are sharp, while others are blurred. Even though this is a snowy scene, the foreground does not appear natural. However, this is easily corrected in a later step.
Three new adjustment layers are added to adjust color, contrast, and brightness. I like to use selective color to target different color groups, such as reds, blues, and yellows, which are specific to items containing only that color. Color balance adjusts color as it is applied to the highlights, midtones, and shadows rather than targeting only items with a given color.
When I am satisfied with the adjustments, I group the previous layers into a new one. With the newest layer selected, use Ctrl+Shift+Alt+E on a PC or Cmd+Shift+Option+E on a Mac to create a new layer from the adjustments below. Once the new layer is created, I convert it to a smart object. In this instance, I am using the layer to open the RAW image editor and make an exposure, highlight, shadow, texture, and clarity adjustment.
The next two layers are additional color adjustments. A hue and saturation layer is used to adjust the lighting and saturation of the house and door. A vibrancy layer is used to change the intensity of the colors in the image. Vibrancy adjusts less saturated colors, whereas saturation adjusts all colors regardless of saturation.
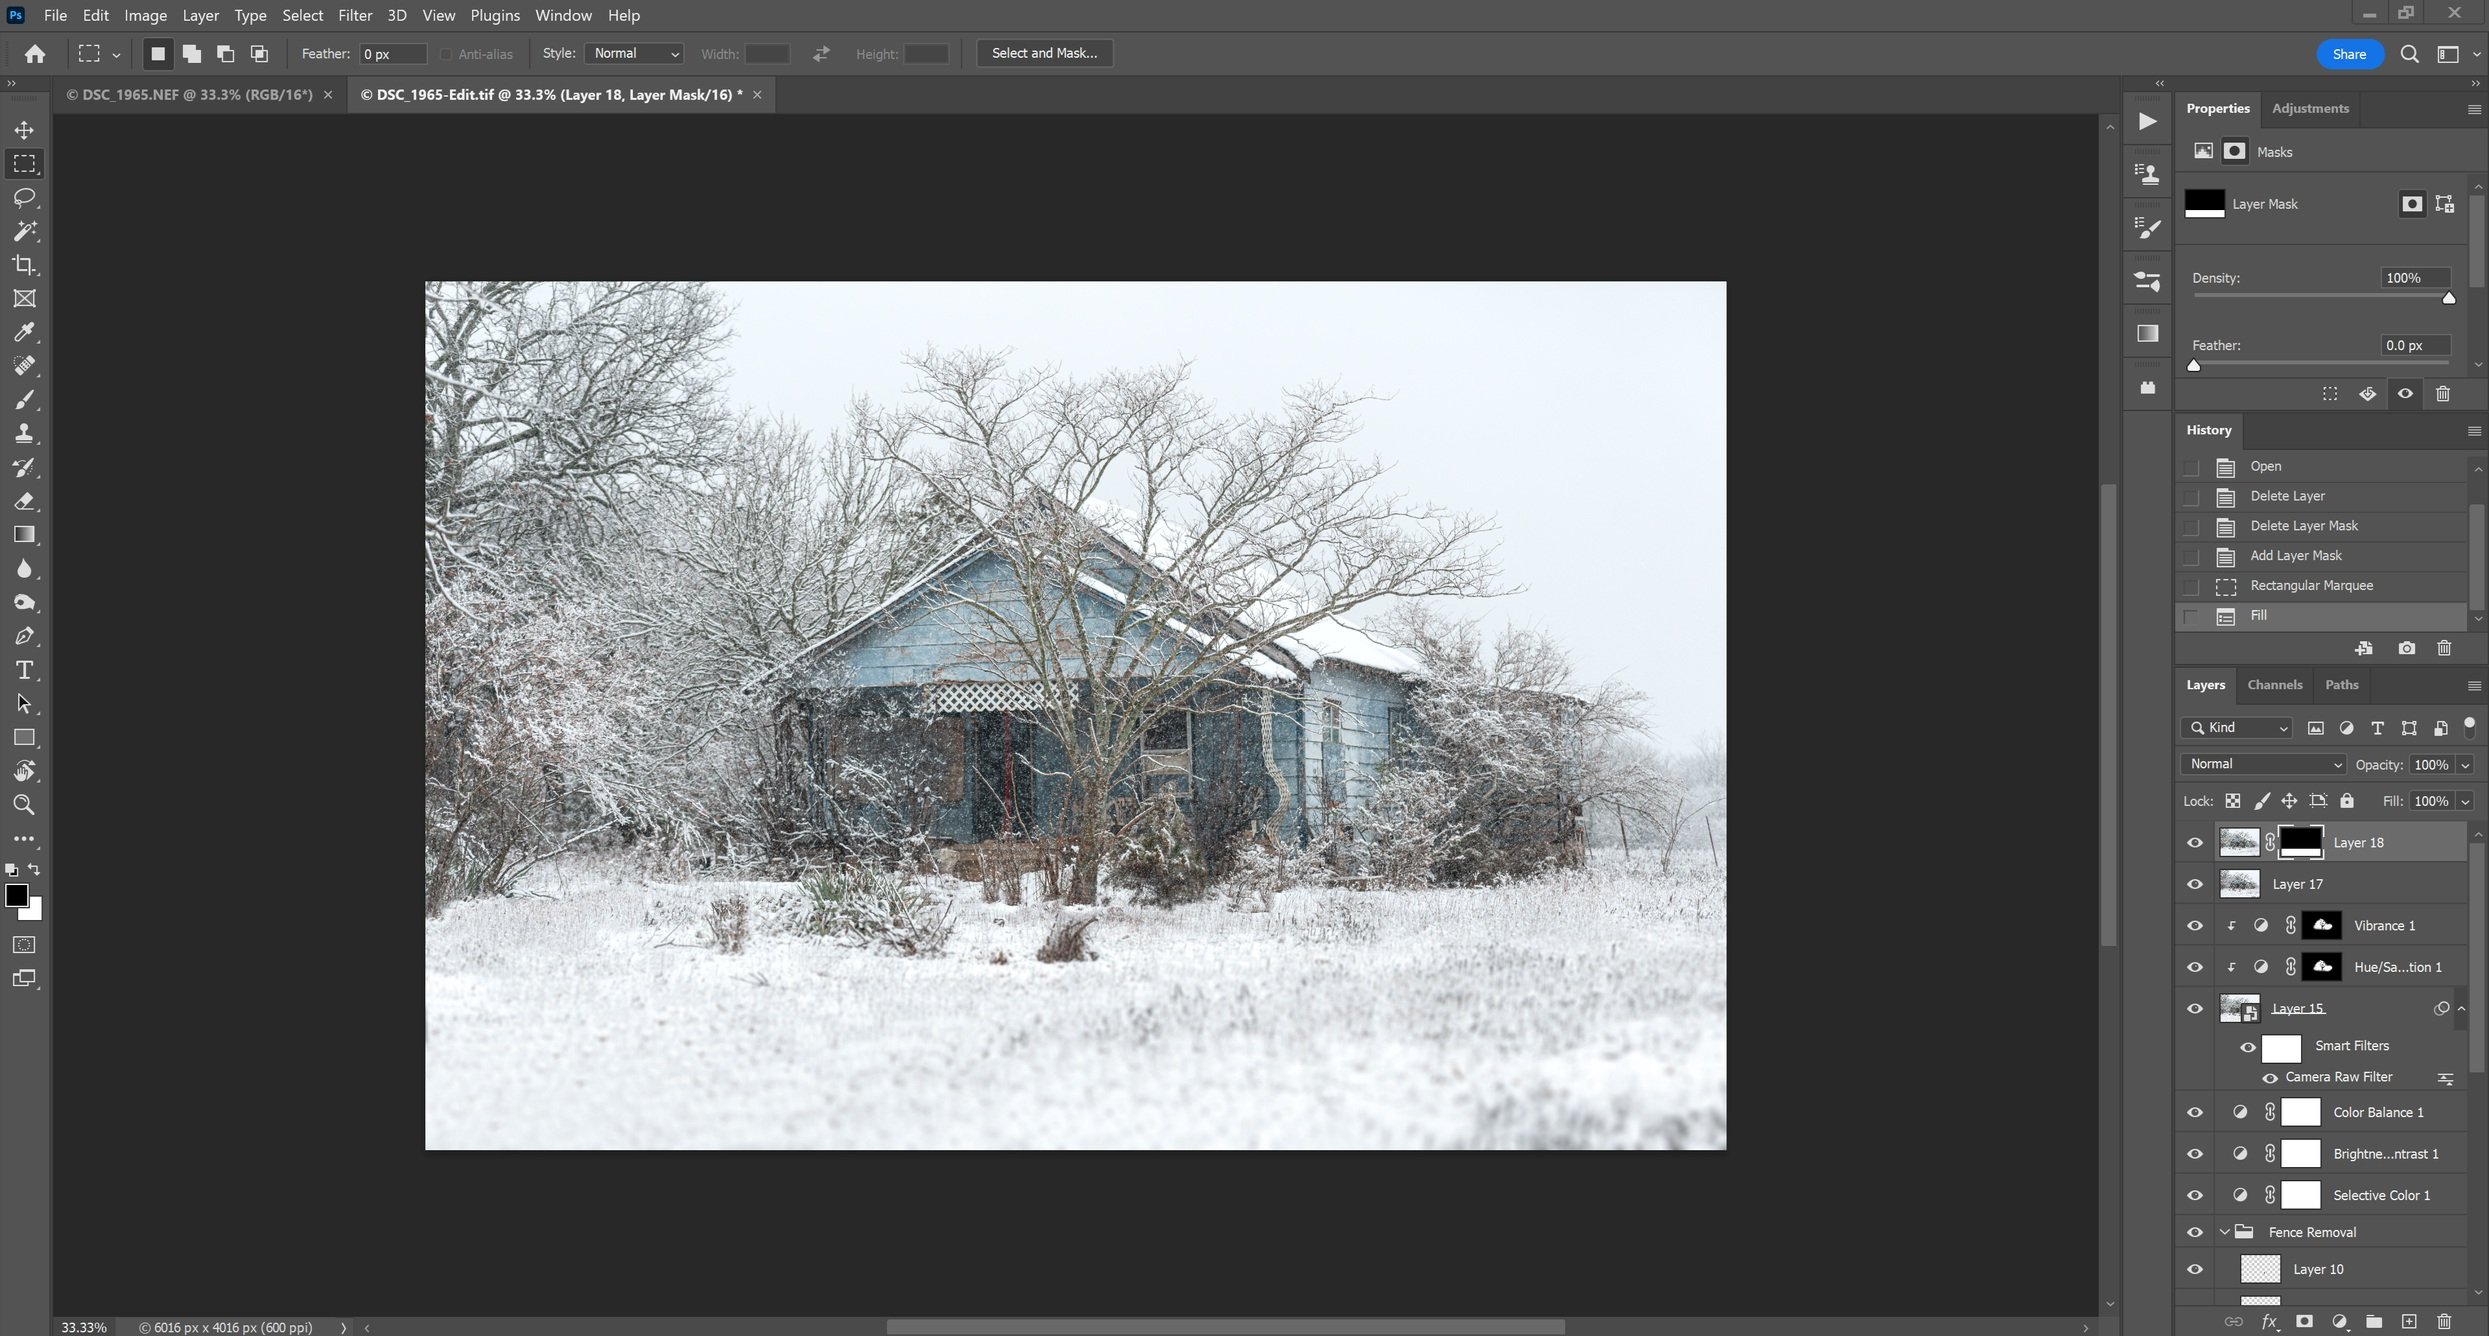
I create a layer mask on each adjustment layer so only the house and door are targeted. I set the layer mask to black. Then with the layer mask selected, I use the paintbrush and white color to paint the house and areas that I want to target. Items such as trees and vegetation are excluded.
A clipping mask (indicated by the arrow pointing down) is also added to each adjustment layer to ensure that these adjustments only apply to the layer below and not to any changes or layers made after.
A new layer is created from the group using Ctrl+Shift+Alt+E on a PC or Cmd+Shift+Option+E on a Mac. From here, I select Filter > Neural Filters, which will open a new window and give options to add an array of filters. I am interested in the blur option.
I can use the blur option to create a depth-of-field adjustment to the foreground, which will hide areas of blotchiness and imperfections due to clone stamping. This is a trial and error process to get the foreground set to a depth blur I like. Before closing out this window, select the output option to create as a new layer.
While the blur filter does an excellent job, it applies a blur to the trees and parts of the house. To correct this problem, create a new layer mask with the layer mask icon, and ensure the color of the mask to white. Select the brush tool and paint black on the areas where you want to undo the blur effect.
A quicker method is to use the rectangular marquis tool. With the layer mask selected, create a rectangular selection with the marquis over the blurred areas you want to remove. In this instance, I started at the top left of the image, drew a line to the right edge, and down to the house’s foundation. Then, I filled the selection with black. Make any fine adjustments with the brush tool and black paint.
I wanted to add a layer of fog. To do this, I made a new blank layer, selected the gradient tool, and set the gradient fill from opacity to white. Using the gradient tool, I drew a line from a point just below the stairs and extended my gradient to a point just above where the image ended. You may need to do this a few times to create a layer of fog you are happy with. If the effect is too strong, then decrease the opacity of the layer. In this instance, I set the layer opacity to 85%.
Name the layers in Photoshop. Some people like to name each layer as they work. I name them last in my workflow. In addition, I deleted the first layer that was created after the vibrancy layer (seen as layer 17). This helps to reduce image file sizes. Once the image closes, it is saved as a TIFF and displayed in Lightroom if the file size does not exceed 4 GB.
I like to make final adjustments to exposure, contrast, highlights, shadows, and texture in Lightroom. I also make adjustments to image crop and roration as a final step before exporting the final product.
Try experimenting with different methods to find a combination of techniques that yield the desired result. The methods I use are non-destructive and allow me to go back and make adjustments anytime. With practice, you will find you can remove most objects while maintaining realism in your images.
Never miss a post! Subscribe here or with the form below, and follow Jake Durham Photography on Facebook and Instagram.


